Showing posts with label Battle Report. Show all posts

12/05/2017

Frontline BattleTech Units In Action

So this past Saturday I got to celebrate part of my birthday with a game of BattleTech against Cheef.  To make it even more unique and memorable, we went with identical forces so no need to point up lists.  So we broke out the cutting edge of technology and pitted a lance of UrbanMechs from my Davion's Caselton Militia against his lance of UrbanMechs from the Marik Militia.  Once the terrain was set up, we would be having as Cheef put it "Urban Warfare in the Woods".
This was also a chance to get not only my larger BattleTech terrain that I've been working on onto the table but also all my finished scatter terrain as well.  We set up on a 4x4 table with plenty of room for our very slow mechs to maneuver.  I set up my terrain as the defender with HPG Station, mobile satellite launch platform, a new power station I've been working on (more on it in a post later this week), the storage tanks, and then the small terrain such as a couple bunkers, defensive towers, and sensor stations.  My small factory piece is on the hill and just off to the right bottom edge of the picture.
So here we see our antagonists for a pre-fight picture.  It was nice to have an all painted battle as the next table over featured a second BattleTech game that was silver on silver.  Whaaaaaat two BattleTech games being played at the same time?  I know, crazy right?  While we had the nice clean high tech looking lanced of painted and based UrbanMechs, they had a fugly Blitzkreig and some other stuff.  So winner our game for the cool factor.
Here we are all deployed in the picture above.  Marik has three mechs coming through the woods and the fourth up on a hill for support fire.  My Davions are looking to repel the invaders and hopefully gain enough scrap and parts to keep their own mechs in top fighting shape.  I mean it's always good when the replacements come to you right?
Early on we saw some ranged shots from all the AC/10s but few hits.  All of our pilots seemed quite rusty but since the mechs are lightly armored, even a single hit from an AC/10 does serious damage.
As we got closer to each other, the hits started to add up.  I was definitely more lucky than Cheef when it came to achieving critical hits but he was getting more hits overall.  We both had 3 mechs in the woods battling while my fourth had a long range duel with his fourth on the hill where they both battered each other senseless.
The first "kill" of the game was one of mine who lost a leg and was rendered combat ineffective.  I ended up finally taking out one of his as well by getting down to being able to pretty much hit it anywhere for it to die.  So about this point I managed to get a head shot with two criticals that take out the pilot with extreme efficiency.  So after having my 3 facing his 4, it's now in my advantage with 3 on 2.
Several mechs are getting to the point of barely functional at this point in the game.  I ended up with one mech that had lost both weapons, had no where left to absorb a hit left, and is too slow to retreat, so what to do .....
That's right, it still has jump jets so who WOULDN'T do a death from above attack?  It doesn't matter that he took a shot on the way in and denied the actual attack, the sight of an UrbanMech trying to Death From Above another UrbanMech is cool as all get out!

But as he DID get finished off ont he way in, this puts us both at two mechs upright, enough armor between them to have one intact UrbanMech, and 3 small lasers as their combined armament because we're all out of AC/10 ammo at this point.  I have one mech that is barely intact and the other while in much better shape, doesn't have a small laser.  Cheef has one mech that has taken both engine and heat sink crits to the point that shooting the small laser or even walking will overheat it and then a mech that was tottering with little left like mine was.  So at this point we called it a draw and the remnants of both sides withdrew before some squirrels or a possom came down out of one of the trees to finish them all off.
Cause yeah, UrbanMechs are THAT cool!
All in all it was a very fun game with some memorable moments.  I'm definitely looking forward to doing something similar again sometime.  So that's all we have for now and thanks for stopping by!  See you all next time!

6/15/2016

Clash With Kharn's Khornies Part 2

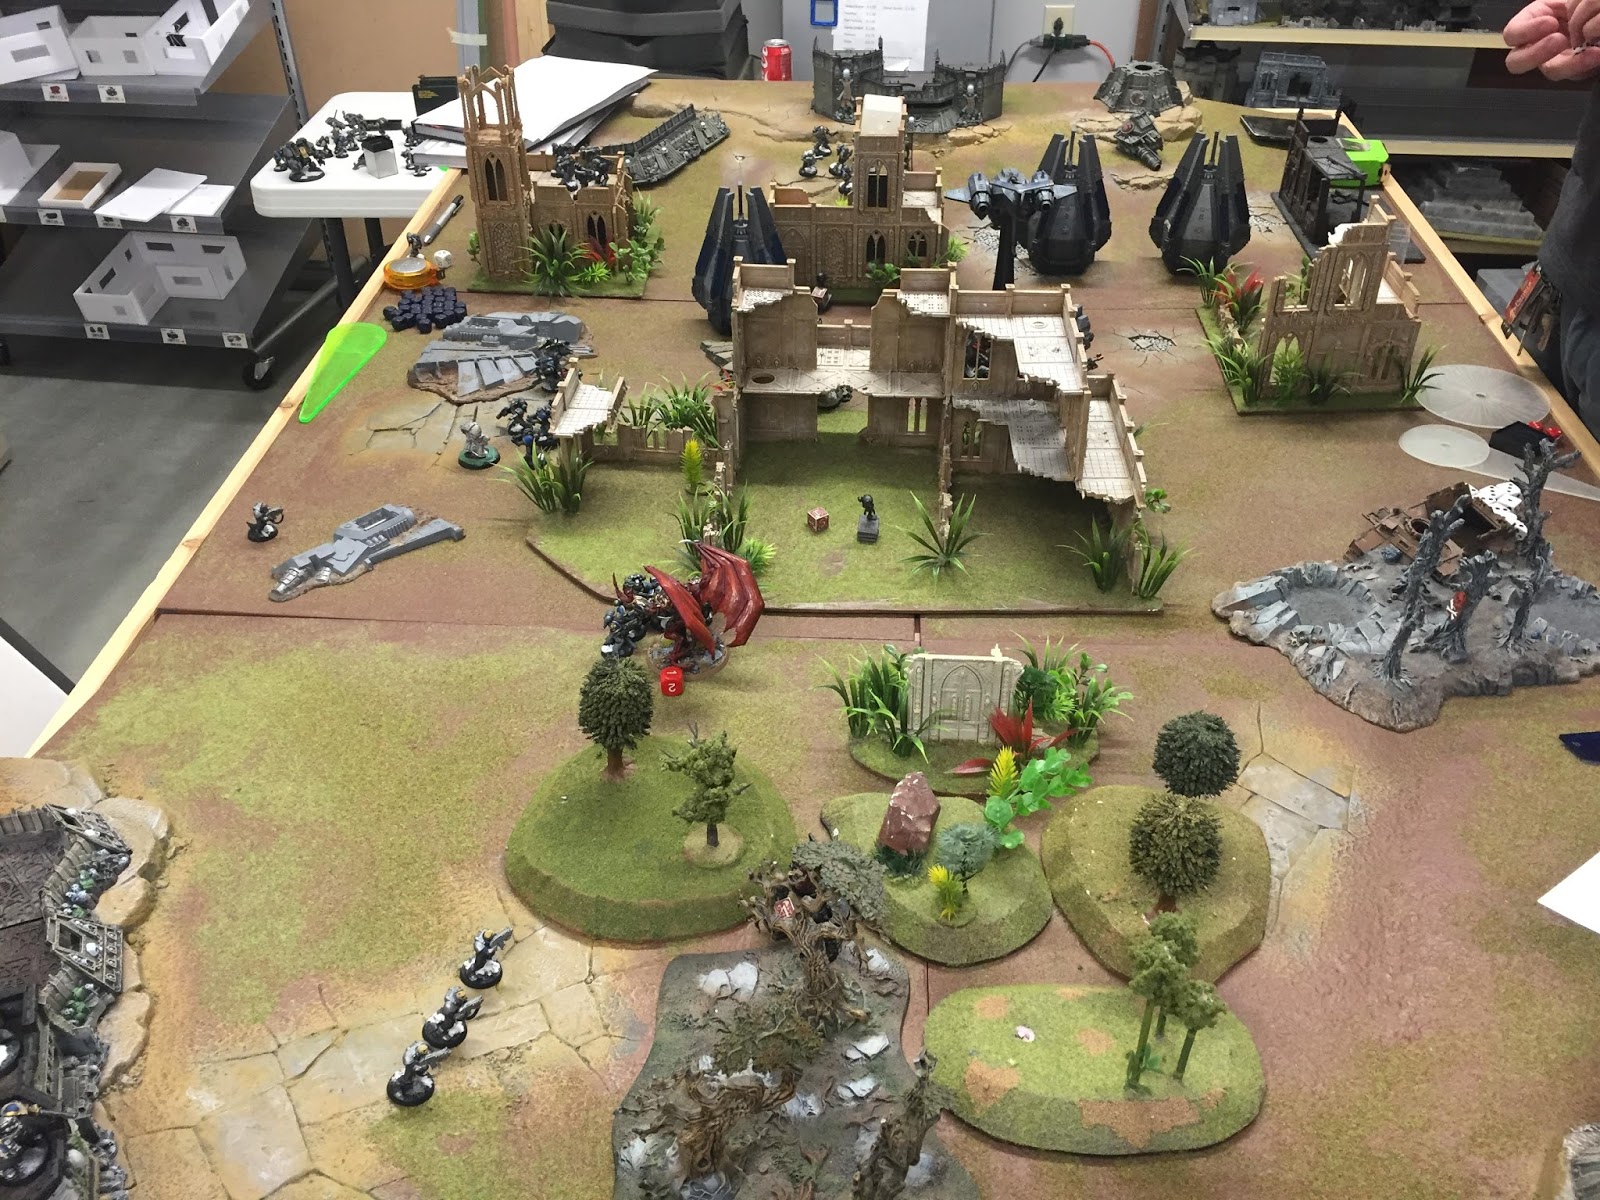
Welcome back for part two of the epic clash of Lions vs Black Legion Khorne.  Last post had the two force lists, so now we're ready to get into the actual battle.  Our FLGS, the Johnson City Hobby Town, is great when it comes to supporting local gamers and has quite a nice selection of terrain to use.  We went with some of the Battle Realm board squares, some nice jungle themed city terrain, some woods, and a scattering of bunker strong points.

We rolled for long table edge deployment and Big Guns Never Tire for the mission with 4 objectives in a line down the middle.  One was by the bunker at the top of the picture, one in between the two buildings just above the midpoint of the board, one in the open area in the middle of the large building, and the last in the woods at the bottom of the picture.  Neverness won the roll to deploy and go first, and took the right side of the board based on the picture.
Board Set Up
He put his Helbrute, Vindicator, and Landraider with the large Black Legion Squad inside it on his right flank, Kharn and his Berzerkers had the middle of the board, and his bikers and small squad has the left flank.  His Daemon Prince and Terminators were in reserve.  I deployed Tactical Squad Bleddyn, Devestator Squad Bretheil, and the Thunderfire Cannon on my left flank, Captain Glyndwr with Tactical Squad Gwionyn in the middle, and Tactical Squad Breithal, Assault Squad Valerius, and Devastator Squad Esgalion held my right flank.  The Sky Talon, both Ironclad Dreads in Drop Pods, and the Sternguard in Drop Pod were all in reserve.  Scout Squad Osric infiltrated onto the objective in the middle of the woods.  The mysterious part turned out to allow 1s in shooting to be rerolled.  The Imperial Fish successor chapter in me was not amused.
Forces Deployed as Turn 1 Starts
I failed to seize the initiative so Neverness started his turn one.  He began with a general push forward which included the Helbrute running to seize the topmost objective.  His Vindicator fired the first shot of the game at my Devastator Squad on the flank but it scattered wildly enough to kill two Tactical Marines instead with a 3rd lost at the end of the turn to the Soulblaze.  The Landraider destroyed the Thunderfire Cannon but failed to get the Techmarine.  He also shot at my Scouts but I made all the cover saves.

I responded by bringing in both Ironclads to start my turn.  Both landed with no scatter between his two tanks.  This let an Ironclad deploy behind his Vindicator and the other between the two with it's flanks covered by the two Drop Pods.  My middle and right Tactical Squads and my Assault Squad all advanced.  Between the left Dev Squad and the Tactical Squad's missile launchers, his Helbrute was killed for First Blood.  The Vindicator was shaken and the Landraider was stunned.  He also lost 3 Bikers to Missiles and the Scouts.  Score at the end of Turn 1 was 5 to 0 (First Blood, Linebreaker, and 1 Objective for me, no score yet for Neverness).
End of Turn 1
Neverness didn't get any reserves on Turn 2.  His Bikers and the small Black Legion Squad advanced on the Scouts.  The Vindicator moved up and turned sideways to get the Ironclad from having a shot at it's backside.  His Berzerkers closed on the closest Ironclad.  He killed 3 Scouts with shooting but failed to charge them with the two remaining bikes.  His Berzerkers charged the Ironclad by wrapping around the Landraider and Drop Pods, and destroyed it.  But since Kharn only managed two hull points, he lost a Berzerker to combat before his Champion melta-bombed the last hull point.

My turn two started with the Sternguard arriving but not the Sky Talon.  The Sternguard came down on the second from top Objective.  I advanced all 3 Tactical Squads (Left one now on the top Objective) and the Assault Squad.  The Scouts and Assault Squad combined to shoot down the two remaining Bikes.  The Vindicator died to Devastator fire.  The Sternguard, middle Tactical Squad, and the Drop Pods combined to kill 8 Berzerkers.  Score was now 9 to 0 (2 Objectives, Heavy Killed, First Blood, and Linebreaker for me).
End of Turn 2
This turn his reserves all showed up.  His Terminators came down in the middle of my backfield and the Daemon Prince flew on toward the middle of the board.  Landraider tank shocked my Sternguard, killing one, then the squad inside deployed on the Objective.  Kharn and his three remaining boys advanced on my remaining Ironclad.  I lost 3 Sternguard to shooting, as well as 3 members of my middle Tactical Squad, and a Scout.  The large Black Legion charged my Sternguard (none lost to Overwatch), Kharn and buddies charged Ironclad (losing 1 to Overwatch), and the small Black Legion Squad charged my Scouts.  Sternguard lost 2, killed 1 and passed break test.  Scouts lost 1 and killed 1 for a tied combat.  Kharn only did one Hull Point of damage and the Ironclad wounded 3 times to get both Berzerkers and Kharn for Kill the Warlord.

 My Sky Talon shows up and heads for his Daemon Prince.  My Captain leaves the middle squad and heads to help the Sternguard.  Assault Squad heads for the Chaos Terminators while Ironclad heads for the Landraider.  Shooting from Assault Squad, both Devastator Squads, most of a Tactical Squad and the Techmarine kills all but 2 Terminators.  Sky Talon puts a wound on the Daemon Prince but it stays flying.  Ironclad fails to hurt the Landraider.  I charge the Terminators with the Assault Squad hoping all the attacks will cause some failed saves but I whiff with the majority of the chances and fail to kill anyone.  I lose 2 Assault Marines but pass the test on double 1s.  Captain joined the Sternguard to combine for 3 kills and 2 lost Sternguard but he passed leadership test.  I lost a Scout in combat and broke but got away to rally.  Score is now 7 to 4 (1 Objective, I Heavy Killed, Warlord, Linebreaker, and First Blood to his 1 Objective and Linebreaker).
End of Turn 3
Neverness started by landing his Daemon Prince and moved close to the right Tactical Squad.  His small Black Legion squad shot at the Scouts and the Landraider shot at the Ironclad.  His Daemon Prince then charged the Tactical Squad taking a wound from Overwatch and the Scouts were charged as well.  I lost all but two Sternguard and killed a couple Black Legion, staying in the combat.  Terminators finished off the Assault Marines.  Daemon Prince killed 2 Marines who held.  Scouts and small enemy squad all fail to kill anyone.

My turn I managed to kill 1 Terminator and fail to hurt the Landraider.  My Captain continues to chew through Black Legion while the last of the Sternguard fall.  My last 3 Scouts lose combat by 1 and my last 3 Scouts fall back from his last 2 Black Legion marines in the small squad.  The Daemon Prince combat was no wounds on both sides.  Score at the end of the 4th Turn is still 7 to 4 (1 Objective, I Heavy Killed, Warlord, Linebreaker, and First Blood to his 1 Objective and Linebreaker).
End of Turn 4
At the start of the Fifth Turn it really started to speed up due to lack of models on Neverness' side.  He killed a Tactical Marine from middle squad with Terminator shooting then assaulted.  His Daemon Prince killed 2 Marines and the squad failed to wound back, and then they broke and ran.  The Daemon Prince consolidates onto an Objective.  Terminator\ killed 2 more marines who then broke and ran off the table.  His Landraider took a hull point off the Storm Talon while removing the Assault Cannon.  He lost another Black Legion to my Captain and failed to hurt him back, but Leadership was passed.  His 2 small squad survivors stayed on the objective.

My turn I finish off the Black Legion in the middle and my Captain consolidates onto the Objective.  My Storm Talon tries to hurt the Daemon Prince but fails to wound it.  I fail to hurt the last terminator with Krack Missile fire from Devastators on left flank.  Right flank Devastators and Scouts combine fire to kill of a Black Legion leaving only one in the woods.  I fail to hurt the Landraider once more with the Ironclad.  Score is now 10 to 7 (2 Objectives, I Heavy Killed, Warlord, Linebreaker, and First Blood to his 2 Objectives and Linebreaker).  Neverness rolls and we're playing a 6th Turn.  This is where I apologize because there is no picture of the end of this turn.
Distraction Pic of Scouts For Missing Turn Pic
Turn Six saw his Terminator fail to charge anything and merely got a shot at my Techmarine.  His lone Black Legion marine failed to hit a Scout with his bolt pistol and charged them.  He was killed though and the Scouts consolidated onto the Objective.  His Daemon Prince jumped over the building to attack my Captain, dealing 4 wounds.  I made 3 Invulnerable saves but failed the last and down he went to give up the Warlord Point.  His Landraider failed again to hit or penetrate the Ironclad.

I killed the remaining Terminator with krak missile fire.  The Ironclad finally rolled high on the 2D6 for penetration with the melta-gun and blew up the Landraider.  And to avenge his Captain, the Storm Talon turned for a shot on the Daemon Prince and scored 3 wounds which Neverness promptly failed to save all of which killed off the Daemon Prince.  At this point it was tabled for him and the final score was 14 Points to 1 (3 Objectives, 2 Heavies Killed, First Blood, Warlord, and Linebreaker for me and Warlord for him).
End of Turn 6
All in all a very fun game.  We both forgot a few things along the way, but nothing major I think.  There was definitely a lot of looking at the rule books and codexes.  I was surprised at the lack of invulnerable save on Kharn, but then he should have killed anything before he took a hit anyway so probably wouldn't notice normally.  Who would have thought that Neverness would fail 4 of 6 penetration rolls on the first Ironclad and 6 of 7 penetration rolls on the second Ironclad.  Only needing a 6 to glance on a 2D6 roll, that should have been a very bad deal for my Ironclads.  So that's how the clash went down and we're both talking about a need for a rematch, though since I called his Space Wolves merely Khorne Berzerkers lead by Tzeentch Shamans, it might just been Space Wolves I see next rather than Black Legion, LOL.

So that's all for now and I'll see you next time for more Ghost Bears and some actual new 40K models as well.

6/13/2016

Clash With Kharn's Khornies Part 1

Various electronic sounds and lights clashed in the apothecarium of the strike cruiser Blodeuwedd as Captain Rhys Glyndwr was tended to by various apothecaries and chapter serfs.  Various members of the strike force's command were also present to check on the condition of their commander as well as give their reports as necessary.  Part of the Captain's armor has been removed, the breastplate with a massive rend running down one side lay off discarded for now in the corner of the room.  A serf works on cleaning the relic blade while an apothecary seeks to cleanse the toxins from his commander's daemon caused wound.
Captain Glyndwr raised up slightly and turned toward his gathered staff, and said with a deep rumbling voice.  "Give your reports."  A techmarine steps forth, glancing at his pad, "Ironclad Gilrain was horrendously damaged.  It will be months before he might even considerably be ready for any sort of deployment.  We will need to evaluate his mental state now as well.  Glanhir suffered minor damage as did the Storm Talon.  The thunderfire cannon you deployed with is a total write off."  Next Veteran Sergeant Blydden spoke up.  "My squad took only three casualties, though one will return to duty in a week or so.  Tactical Squad Breithal took a number of injuries as well.  Tactical Squad Gwionyn, Sternguard Squad Ealdredd, and Assault Squad Valerius were all but wiped out.  No one from those squads escaped without injury and only a handful will return to service.  Scout Squad Osric accounted well of itself, assisting with the destruction of the enemy bikers as well as an enemy squad in addition to securing their assigned objective.  Only three remained unwounded at the end of the combat, but while Sgt Osric was slain, four of the scouts were merely injured and will return to duty."
Captain Glyndwr winces at the toll paid but answers in a steady voice of iron, "Elevate the three to full battle brother status on our return to Cymru.  The other four we'll review for promotion on the journey home.  And of our enemies?"  "There is no trace of any survivors still on the world my Lord," replies Captain Mallory.  "All remains have been purged or turned over to our librarians for proper containment.  The remnants of the defiled Vindicator and Land Raider have been purified of taint before being utterly destroyed.  We found a number of Kharn's berzerkers from his retinue piled up among the dead, but there is no trace of Kharn himself, though we know that Glanhir dealt him a serious wound."
"And of the daemon prince that dealt me this wound?" asked Captain Glyndwr.  He was hurt when he struck you down Lord, but the Stormtalon caught him unawares and grievously injured him, driving him back into the warp.  The pilot and techmarines have named the vehicle Glynu Awyr, or Sky Cleaver, for the feat.  We did not find any mention in our records or any immediately available to us that identified the daemon though.  His obvious devotion to Khorne and his personal iconography that we noted will hopefully help us identify him in case of future meetings against him.  We did recover his fallen axe and it has been placed in a stasis field until it can be properly stored at Llew Gyr."
"Then the world was saved and while losses were heavy, all did their duty and prevailed.  Let the chaplains begin their litanies of readiness and preparation while we see to our wounded and dead.  We will be prepared for I do not foresee the Black Legion or their Khornate allies giving up that easily.  We will meet them on the field of battle again I think."

---------------------------------------------------

Well, that was a very very fun game with lots of exciting points.  While we were both quite rusty with the rules (there was much flipping in the books the entire game) and some things were forgotten by both of us, it went well and was quite enjoyable.  The Lions have a memorable win for their archives and some stories to tell their battle brothers who did not get to participate in the battle.  The rest of this blog post will contain the army lists and then in a couple or few days I'll have part two with the actual battle up so as to not make this post too long to read.

First up, we have my force of the Lions of Harlech, Strike Force Glyndwr at 2,000 points with 1 HQ, 4 Troops, 3 Elites, 3 Heavy Supports, and 2 Fast Attacks.  It was 74 models total, all of which were painted which is something I was glad I was able to pull off.  Now down to the brass tacks.
Captain Rhys Glyndwr, 4th Company (the Lion's Claws) Commander
     Artificer Armor, Relic Blade, Storm Shield

Tactical Squad Bleddyn
     Sgt Bleddyn, 9 Marines, Missile Launcher, Flamer

Tactical Squad Gwionyn
     Sgt Gwionyn, 9 Marines, Missile Launcher, Flamer, Combi-plasma

Tactical Squad Breithal
     Sgt Breithal, 9 Marines, Missile Launcher, Flamer, Combi-plasma

Scout Squad Osric
    Sgt Osric, 9 Scouts, Bolt Guns, Camo-cloaks

Sternguard Veteran Squad Ealdredd
    Veteran Sgt Ealdredd, 9 Sternguard Veterans, Drop Pod

Assault Squad Valerius
    Sgt Valerius, 4 Assault Marines, 3 Plasma Pistols

Devastator Squad Bretheil
     Sgt Bretheil, 4 Devastator Marines, 4 Missile Lauchers

Devastator Squad Esgalion
     Sgt Esgalion, 4 Devastator Marines, 4 Missile Lauchers

Ironclad Dreadnought Gilrain
     Heavy Flamer, Meltagun, Drop Pod

Ironclad Dreadnought Glanhir
     Heavy Flamer, Meltagun, Drop Pod

Thunderfire Cannon, Techmarine Saellon

Skytalon Gunship
     Assault Cannon, Skyhammer Missile Launcher

And then Neverness' Black Legion forces of Khorne.
Kharn the Betrayer

Daemon Prince of Khorne, Axe of Blind Fury, Power Armor, Gift of Mutation, Ichor Blood

5 Chaos Terminators, Mark of Khorne
     Champion, Combi-bolter, Powerfist
     Combi-bolter, Power Axe
     Heavy Flamer, Powerfist
     Combi-melta, Chainfist
     Combi-flamer, Chainfist

Hellbrute, Multi-melta, Crazed

Black Legion Squad, Veterans of the Long War, Mark of Khorne
     Aspiring Champion, Combi-melta, Power Axe, Gift of Mutation, Krak Grenade
     9 Chaos Marines, Plasmagun, Krak Grenades

Black Legion Squad, Veterans of the Long War, Mark of Khorne
     Aspiring Champion, Gift of Mutation, Krak Grenades
     4 Chaos Marines, Krak Grenades

Khorne Berzerkers, Veterans of the Long War, Icon of Wrath, Mark of Khorne
     Berzerker Champion, Gift of Mutation, Chain Axe, Plasma Pistol, Melta Bomb
     12 Berzerkers, 2 Plasma Pistols, Krak Grenades

Chaos Bikers, Veterans of the Long War, Mark of Khorne
     Champion, Chain Axe, Gift of Mutation, Melta-bombs
     4 Bikers, Plasmagun, Meltagun

Landraider
     Destroyer Blades, Dirge Caster, Havoc Launcher, Warpfire Gargoyles

Vindicator
     Dirge Caster, Warpfire Gargoyles, Combi-bolter


Neverness took some hard hitting units, but the sheer number of bodies that I could bring to bear really helped me out.  It let me concentrate fire on just one or two units at a time while he had to completely ignore some of my units.  So that's the end of part one, stay tuned for part two, the actual turn by turn account of the fun later in the week.  See you all next time and thanks for reading.

3/14/2015

Albion Triumphant

So last evening I got my second game of Bolt Action in against Bob and his Germans.  We stretched it a bit and played a 1000 point game which let us try out some of the rules that we haven't used yet at 500 points such as Air Strikes, Mortars, Sniper Team, and there was even an infantry close combat.  The mission was maximum attrition with 10 units on his side and 11 units on my side.
The battlefield before deployment
I lost a total of 3 units which included both 5 man squads representing the two halves of Section C of 11th Platoon and the recce jeep.  Bob lost his light tank, 2 of 3 infantry squads, his Pioneer squad (with flamethrowers, thank goodness they didn't get used), his forward observer, his officer, and his mortar team.  In true blogger fashion, after taking the board set up picture, I got so involved in the game that I never took another picture.

We both had mixed luck on the dice.  I had a section of infantry with just one pin marker that didn't activate twice due to being unable to pass leadership of the modified 9.  Then there was the small assault squad that paused to rally and dropped 5 pin markers of the 6 they had picked up.  C Section has taken the most casualties in the two battles by far but they've taken out a light tank in each battle.  I think assaulting with anti-tank grenades is definitely the way to go, though as my opponents adapt to that, it's likely to change.

I'm a fan of mortars now.  The spotter making it a lot easier to hit was a big boost and they really could pile the pin markers on a unit.  My medium mortar kept his pioneers pinned in place while slowly whittling them away.  My sniper team was completely useless.  He took 4 shots and got a total of 1 hit which didn't wound.  I'm in no hurry to take this unit again.  The Medium Machine gun team did ok, but I think I like units that are more mobile.
2nd Lt. Marlowe again did very well leading his troops in battle.  At one point late in the game, 4 remaining members of a German squad assaulting him and his one remaining aide.  The first round of combat saw no injuries taken which lead to a second round where the aide and a German soldier were laid low.  The Lt. then finished off one more German soldier which scattered the other two.  An infantry assault being fought until it's decided is interesting, but I can see losing most of a squad because one man was killed to lose the combat could be annoying.  I'll have to see how it works more in the future.  A bit on the fence on this one.  Going back to the Lt. though, 2nd Lt. Vincent Marlowe was awarded the Military Cross for gallantry as I feel he earned a bit more than another mentioned in dispatches for his performance.  He's also being looked at for promotion to 1st Lt.

The ineffective sniper has been assigned field punishment and is busy digging new latrines and foxholes.  Hopefully he'll learn his lesson.

That's all for now and feel free to leave some input.  I like how my paras are evolving and as soon as I finish moving this month, I'll be ordering the last of my miniatures to get them put together properly and retire the borrowed Naval Infantry from my 40K range.

10/12/2014

X-Wing ..... Let's Have A Bit Of Fun

So yesterday evening I finally made it back up to Johnson City and the FLGS there for some geek time which included a 3v3 game of X-Wing.  Let's see how it went.  Warning, this might end up being fairly lengthy.


This is Trooper Reporter 1179 coming to you live from the Galactic News Station on Coruscant.  Top news today is a report of a battle between our Glorious Imperial Naval Forces lead by the Sith Lord Darth Vader against a rabble of Rebel Forces who dared stray out of their dark hiding places.  We were able to get a News Shuttle nearby for some images while our crack team of ace field reporters deployed to bring us this unfolding story.  We go now to Trooper Reporter 472 live on the scene.
This is Trooper Reporter 472 coming to you LIVE from the J'City System near the FLGS planet where it seems that three different rebel groups have gathered together in some sort of attempt to disrupt Imperial rule in this area.  Our own Imperial Naval forces have dispatched similar forces and seem to outnumber the enemy.
 

As these shots from our GNS News Shuttle shows that the rebels have assembled what looks like a B-Wing, a pair of X-Wings, 4 Z-95 Headhunters, and a pair of rough looking freighters.  This sort of rabble is what you'd expect from the Rebellion.
We were able to get a holocam operator into the Imperial Command Center where you see here our glorious cabal of Moffs and Admirals preparing to sweep the Rebel's smattering of ships from the system.  There are a number of Tie Fighters of course with some Interceptors and Bombers and even a Tie Defender in evidence.  Even more importantly, we've learned that Sith Lord Darth Vader will personally be leading the fight from his own personalized fighter.
 Things on the Imperial right flank where I'm stationed at seem to be in balance for the moment.  An Interceptor is escorting a pair of Bombers in against a trio of Headhunters and a B-Wing.  Both sides seem to be inflicting light damage on each other while trying to get into optimal firing positions.  Let's cut over to News Trooper 2069 who is at the other end of battle reporting.
This is News Trooper 2069 coming to you live from the Imperial left flank.  What we've seen down here is a Tie-Defender and Lord Vader leading about 6 Imperial Ties and a Interceptor against the Rebels.  We've identified the larger Imperial freighter as the Scarlet Harlot, a ship with a questionable reputation.  For some reason the Imperial Ties seem reluctant to approach her and they just seem to be hanging around her in a tight group.
 The pair of X-Wings and the other Z-95 in this part of the battle seem to have taken out one of the Tie Fighters that was out scouting and the main lines seem to be closing in now.  Back to you 472.
News Trooper 472 here again bringing you the latest update.  The Imperial forces on this flank of the battle seem to be crumbling under the cowardly rebel attacks as an X-Wing has joined the combat over here to overwhelm our brave pilots.
Outnumbered 2 to 1, we've lost a bomber and the interceptor with the remaining bomber damaged and heading for the other Imperial forces.  The main question in this part of the battle is "Where is everyone else at and what are they down there doing?"  There is a growing belief from the forces falling back here that the Admirals and Moffs handing the Imperial left flank are not being aggressive enough against the outnumbered rebels and have squandered a chance to salvage the right flank.  Back to you 2069.
Did you see that???  Lord Vader and the forces with him have gotten over whatever was keeping them at arm's length from the Scarlet Harlot and have suddenly gone after the Harlot with a vengeance, and boy are they sure handling her roughly.  I thought you had to pay extra for something like that.  They've managed to destroy the Headhunter that was in this part of the battle and have traded a Tie-Fighter for some more damage to the rebel ships.
 The rebels who were on the Imperial right flank are flowing into the battle on the left flank now.  The remaining bomber was gunned down in the back by the cowardly B-Wing as a pair of Headhunters take out a Tie-Fighter.
 The Harlot can finally not take anymore of the rough stuff and goes down in a final climax of explosions.  The other fighters then turn on the other freighter, which seems to be a HWK, and proceed to damage it as well as the pair of X-Wings.
This is News Trooper 2069 with a last report before we sign off from this location.  Our position is no longer safe as the criminals have continued to roll in a wave over the Imperial forces and downed one fighter after another.  The HWK is gone but the only friendly I see still flying is Darth Vader himself and he has at least 6 enemy fighters heading for him.  Even a Sith Lord has his limits and he seems to be withdrawing from the battle.  Words cannot describe the horror of these turn of events that we've witnessed here to day.
This ... this is News Trooper 1179 coming you from GNS Headquarters.  We, along with all of you our viewing audience, are in shock at this surprising victory by the criminals and rogues that make up the Rebellion.  I'm sure this will lead to inquiries and investigations into the rumored appointments of social and political commanders rather than truly trained gifted commanders that our brave pilots deserve.  The Moffs and Admirals who lead this attack must be held accountable for their conduct and lack of victory.  This is GNS signing off.


So all in all, this was a very fun game.  Being on the winning side just made it more enjoyable and I'm looking forward to next Saturday where I'll be playing some CBT against Skylar.  Until later all.

6/19/2014

Bad Me

So I've been a bad blogger this past couple weeks.  My work schedule has changed, and it's been a bit chaotic so I've got nothing done on the hobby front unfortunately.  I did make it this past Saturday night up to Johnson City for Gamapalooza which was discussed HERE.  It was nice seeing not only so many gamers out but also so many different gaming systems getting played.

For my own game that evening, I had an 1850 point match against Cheef's GF's Fem Fa Tau who've been cutting a rough trail of wins over a number of different opponents including Neverness who had asked me to avenge his poor boys in blue.  (Now I'm not an Ultrasmurf fan, but a marine's gotta defend even the smurfs against the threat of xenos.)  So I decided to take a list like I've never fielded before just to really mix things up and to not be expected.  Thus the "Ancients and Initiates" list was born.

My list was
Master of the Forge w/ combi-flamer in case someone got too close
3x 10 Scouts with Camo Cloaks and Shotguns
1x  6 Scouts with Camo Cloaks and Sniper Rifles
3x  Ironclad Dreadnoughts with Meltaguns and Heavy Flamers as Elites
3x  Venerable Dreadnoughts with Twinlinked Lascannons and Missile Launchers as Heavies
3x  2 Landspeeders with 2 Heavy Bolters each

It turned out to be a fairly fun list to play as a one off, though not one I'd want to take often.  The Tau were fielding a commander with all the bells and whistles, 2 small units of fire warriors, 2 small units of pathfinders with rail rifles (one had the upgrade character and outflanked), 6 stealth suits with 1 fusion blaster, 2 Hammerheads with railguns, 1 Piranha with fusion, 1 C'tan with writhing worldscape and a short range gun effect, and then a necron lord with 10 immortals.  It was her first time using the tin robots so they gave her a bit of trouble on rules and such, and since I rarely play against the tin boys I wasn't much help there either.

We played long table edge deployment and Big Guns mission with 4 objectives.  We played on what she dubbed the Pretty Table.  This was still a 6th Edition game as she hasn't had a chance to delve into 7th yet.  Unfortunately I was still a bad blogger and no pictures were to be taken.

So she deployed first with her commander, both fire warrior teams and a pathfinder team in a large ruin in the middle of her deployment zone.  She put a hammerhead in each corner of her side of the table and the Necron contingent went behind her big ruin in the middle.  Her Piranha was going to deep strike and the stealths and second pathfinder team were outflanking.

I put my speeders behind terrain, Venerables in terrain for cover saves, the Master of Forge went in a building to hide as he was only in the list for the dread slots and bolster, the Ironclads used ruins to block LOS to the hammerheads to be ready to advance up board, and the scouts all infiltrated.  The snipers went into a building that I bolstered with the Master of the Forge.  The Scouts with shotguns all went in to be ready to grab objectives.

Her first turn wasn't too eventful due to lack of good shots.  I made most all the cover saves and lost only 1 sniper and 2 shotguns from the middle squad and a shotgun from my left flank squad.  My first turn the speeders came out to play and everyone else advanced except for the Venerables which stayed where they were.  Heavy bolter fire racked up the kills and one fire warrior team died, one lost 4 warriors (other two couldn't be seen and thus couldn't die) and broke and ran, and the pathfinders lost everything but a drone which broke and ran.  The middle scout squad managed a charge on the Immortals which moved up and thus got them tied up in combat.

Her second turn saw the piranha come in inside my deployment area and the other pathfinders showed up but on a flank with no good deployment options on my right.  They went into some trees in front of her hammerhead but didn't have real range to anything much less LoS.  Her other hammerhead took a hull point off a speeder and then her commander finished it and his buddy off with missile pod fire.  I lost a few more scouts and the Piranha missed the side armor shot on a Venerable but it's drones got a hull point from a shot in it's back.  My turn saw the drones die and the Piranha lost a hull point.  Her commander took a lot of fire and was down to one wound.  Immortals still were tied up in combat while the Ironclads continued to advance.  One just made it into the Immortal combat and I now had a 3 scouts squads holding objectives (snipers and the other two shotgun squads).

Third turn saw still no stealth suits, her commander drop 2 more speeders, her piranha connected to kill the wounded venerable, her hammerheads continued to be denied with cover saves, and the Immortal combat keep dragging on with tied combats.  My turn saw the Piranha die, her commander went down, a glance get through for a hull point on a Hammerhead, and the 2 remaining speeders took out all the pathfinders but the special character who had one wound left.  Her Immortals lost combat by one and broke and ran.

Turn four the stealths are in .... and on the side of the board she doesn't want them.  They try and get a dread and don't have range to hit the closest scout squad.  Immortals rallied and C'tan took out the lasts two scouts from that fight.  My turn four saw an Ironclad almost to a hammerhead, the pathfinder character get BBQ'd by an Ironclad, and that's it.

Turn five I lost a couple scouts to burst cannons from advancing stealths and the C'tan charges an Ironclad which put 2 wounds on it from overwatch and then they mutually killed each other.  I charged a hammerhead and only shook it for a hull point.  At that point it was over with me holding 3 objectives and having scored all 3 secondaries and she had a point from killing a Heavy Support.  The Imperium is avenged and the Tau are held in check.

I think the only thing that held her back in the game was that I think like a lot of Tau players she was trying more to kill me with firepower rather than playing the mission such as trying to railgun dreads in cover rather than placing pie plates on my scouts (which worried me which is why I was being aggressive with the Ironclads to try and keep her attention on them since if they died as Elites, no VPs for them).  She was also real unfamiliar with the Necron rules and that hampered her from using them effectively as well.

All in all it was a fun game and hopefully I'll get some hobby stuff rolling again now.

4/20/2014

It's A Small Wagh After All

So this past Saturday evening, I ventured up to JC and their local FLGS for a night of 40K.  I was facing off against Cheef's Orks and it seemed we both planned on bringing the armor 14.  I did it a touch better though with 3 land raiders to his 2 battle wagons.
Lions of Harlech
Captain w/ Artificer, Storm Shield, Power Weapon
Command Squad w/ Champion (Power Sword), Apothecary, and 3 Vets with Power Swords
2 Landraiders
1 Landraider Crusader
2 Tactical Squads with Flamer and Heavy Bolter
1 Nine Man Scout Squad w/ Cloaks and Sniper Rifles
Ork List
War Boss w/ Power Claw attached to a 30 boy squad
Battle Wagon full of Tank Bustas
Battle Wagon full of Warboss w/ Nobs, mix of Huge Choppas and Choppas, Boss Pole and Pain Boy
Grot Lobba
Grot Cannon
Aegis Line with Gun
Small Commando Unit w/ Power Claw

Game ended up being Big Guns Never Tire with 5 objectives and short table edge deployment.
Lions Deployment
I missed getting a pic of his deployment somehow but he put his Grot stuff behind the aegis on the hill at the back of his deployment, his battlewagons beside each other on his right flank, and large boy squad in the middle.
My first turn was uneventful with landraiders moving up and only a few boys dying in the middle squad.  His turn saw the tankbusters get a glance on a landraider and his lobba killed a pair of scouts.
Turn two is where I began to thin out the big squad majorly.  The landraider and crusader moved up and the tactical squad deployed.  Between flamer, hurricane bolters, bolters, heavy bolter, assault cannon ... The squad went WAY down in size.  I also put a wound on the grot cannon.
He then moved the boys toward my squad, Matilda moved up with the tankbustas and the other battlewagon went sideways toward the middle of the board unloading the nobs onto an objective.  He killed another scout with the lobba which was pinned on a double box car roll.  All his shooting into the tactical squad killed 1 marine.  Overwatch killed 3 orks and then he failed the charge by rolling a combined 3 inches.
Turn three I started by unloading the command squad out the crusader and the tactical squad shimmied over a bit to get a better angle for the flamer.  Landraiders all moved for better angles and to avoid being autohit targets if charged.  Shooting took the boy squad down to just the warboss, first blood finally scored.  I also put a wound on the Aegis gun.  The landraider on the far side put a hull point on Matilda and took out the zap gun.  The command squad and captain charged the nobs.  I managed only 2 wounds to his 3 inflicted back but passed leadership.  This was the beginning of a VERY long combat.

His commandos showed up and came in near Matilda which managed a third glance on my landraider on that side.  He pinned my scouts again by killing two with his lobba and an 11 rolled on my part.  His empty battlewagon tankshocked my tactical squad and I moved safely out of the way.  His lone warboss charged the Crusader and destroyed it.  The Wagh was declared this turn and the reroll was needed for that warbosses charge.  Since the one model was the only one that got to use the Wagh, I still maintain that this was a very small Wagh.  The combat between command squad was a grind with a wound on each side.  I was down to my captain and the apothecary.  He killed another scout this turn as well.

I then forgot to take some pictures for a while but how it went down was like this.  My turn 4 I rammed his Matilda with my Landraider for no damage and then took a hull point off it with lascannons. Empty landraider finished off the aegis gun.  My tactical squad charged his empty battlewagon with krak grenades and managed two glances after missing with 6 out of 8 attacks.  The central combat continued onwards with my captain taking a wound and 1 nob dying but he stayed in the combat with the boss pole reroll which finished a second wounded nob off.

His turn saw his warboss assault my empty landraider but only get a single glancing hit on it which his commado boss charged the full landraider with a wiffage.  The combat in the middle saw no wounds on either side and on it went.

My turn five I backed up my full landraider onto an objective and shooting from it killed two commandos.  My empty landraider tank moved up and killed the grot cannon while the tactical squad charged and finished off the empty battlewagon.  Central combat saw only one wound on the nobs but easily passed leadership.

His turn five saw the grots without a cannon move toward the objective by the grot lobba.  The commandos moved toward the full landraider but failed the charge range.  My Apothecary finally died and then my captain took a second wound but didn't flee.

My turn six saw the tactical squad unload from the landraider and shoot down the commandos in a hail of bolter fire.  The other landraider tankshocked the cannon grots and the lobba which broke them both with the cannon grots going completely off the table.  My captain finally died and I made a note to no matter what, find the points for the relic blade as needing fours to wound was nigh impossible.

His turn six saw the lobba grots continue to flee off the table and his tankbustas failed to get the final hull point off the other landraider. Turn six was where it ended when rolled for and we counted it up.  We both had 2 objectives, both had warlord kills, then I had line breaker and had killed 2 heavy slots to his 1 killed in return which made it a two point win for me.
 
All in all it was a tightly contested game and I don't think either of us were expecting what the other brought so it made it interesting there as well.  I also took pleasure in the fact that another marine player (interestingly enough named Corey) was taking the other ork army represented that night to the woodshed as well.  It was not a good night to be a greenskin.